
 今回もまたcocos2d-xのネタです。
前々回に画像の表示方法についての記事を投稿したんですけど、もうひとつCCScale9Spriteというのがとても便利なので、それについても調べたことをまとめておきます。
それでは、画像付きで本題です。
CCScale9Spriteとは?
もともとiPhoneアプリ開発環境ではobjective-cのUIImageの中で実装されてるのとほぼ同じらしいんでiPhoneアプリ開発者にはおなじみのものかもなのですが(参考:[iPhone] UIButton にひとつの画像で様々な大きさの背景画像を貼付ける)、それをcocos2d-xで実装したものとなります。
画像を普通に縦と横違う倍率で拡大したりするとどうしてもギューンってなって四隅の崩れが目立ってしまいますが、CCScale9Spriteを使うとそれを抑えることができます。
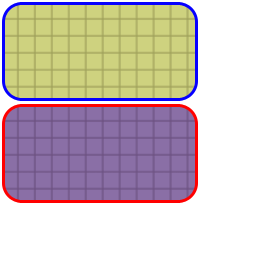
![]() ひとつの画像を複数のボタン背景に使い回したり、ポップアップ用のダイアログボックスを用意したりという風に色々な用途で使っていけそうです。
ひとつの画像を複数のボタン背景に使い回したり、ポップアップ用のダイアログボックスを用意したりという風に色々な用途で使っていけそうです。
使ってみる
このCCScale9Spriteは通常のcocos2d.h内にはありません。一緒に入ってくるextensionsの中にあります。 というわけで、これを使う時には「cocos-ext.h」をインクルードします。
また名前空間も「cocos2d::extension」となります。cocos2dxではその名前空間を使う用に「USING_NS_CC_EXT」が定義されているので、面倒ならそれを書いとけば問題ないです。
なお、CCScale9Spriteは通常の画像とテクスチャアトラス(スプライトシート)両方に対応しています。 というわけで今回テスト用に2つの画像を用意しました。

通常画像(testbg.png)
テクスチャアトラス(test.plist。testbg2.png testbg3.png)
それぞれの大きさは共に【200×100px】です。
どんな感じに引き延ばされるのかわかりやすくする為アレを入れました。えっと、アレのことなんていうんでしたっけ…グリッドです。
実装してみる
使い方は結構簡単です。
- 外側と内側の矩形(CCRect)を元に作成する
- setContentSizeで大きさを設定する
CCScale9Sprite::create(“画像ファイル名”,(外側の矩形),(内側の矩形)); CCScale9Sprite::createWithSpriteFrameName(“認識画像名”,(内側の矩形));
テクスチャアトラスで作成する場合は下のcreateWithSpriteFrameNameで、中の認識画像名+その内側の矩形を入力するだけでよく、外側の矩形は自動で入力されます。 矩形はどちらも画像の一番左下を基準にして入力します。
#include "cocos-ext.h"
using namespace cocos2d;
USING_NS_CC_EXT;
//(省略)
//使用する箇所で
	const CCSize visibleSize = CCDirector::sharedDirector()->getVisibleSize();
	CCScale9Sprite* pScale = CCScale9Sprite::create("testbg.png", CCRectMake(0, 0, 200, 100), CCRectMake(20, 20, 160, 60));
	pScale->setContentSize(visibleSize / 3 * 2);
	pScale->setPosition(visibleSize / 2);
	this->addChild(pScale);

//テクスチャアトラス版
	//読み込んでなければ読み込んどく
	CCSpriteFrameCache::sharedSpriteFrameCache()->addSpriteFramesWithFile("test.plist");
	CCScale9Sprite* spr0 = CCScale9Sprite::createWithSpriteFrameName("testbg2.png", CCRectMake(20, 20, 160, 60));
	pScale->setContentSize(visibleSize / 3 * 2);
	pScale->setPosition(visibleSize / 2);
	this->addChild(pScale);
簡単ですね。
ただ、いちいち矩形を指定しないといけなくて面倒だなぁって感じてしまうのはぼくだけでしょうか(´・ω・`)
それに実をいうと、これだとうまくいかないケースがあります。
実際に上のやり方で通常版のとテクスチャアトラス版を読み込んでみたものが下のになります(左が通常画像版です)
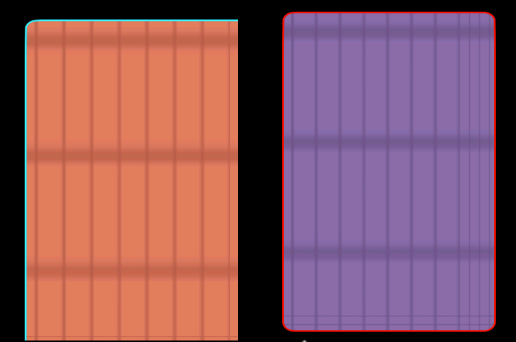
通常版は途中で切れちゃってるし、テクスチャアトラス版も周囲は大丈夫なものの、中の引き延ばしがずれてることがグリッドからもわかりますね。
なぜこうなった
結論からいうと、以前投稿したマルチ解像度対応にした結果みたいです。
(cocos2dxでマルチ解像度に対応させる)
このマルチレゾリューション対応時に設定した「CCDirector::setContentScaleFactor」が悪さをするようです。setContentScaleFactorは、解像度の違いを吸収してくれるマルチ解像度対応のキーとなるような子なんですが、CCScale9Spriteで指定する矩形ではそれが対応されない為、誤差が生じてしまうようなんです。
なのでこちら側で誤差を吸収するようコーディングしなおすとちゃんと表示されます。
/**
 *  cocos2dxにはCC_CONTENT_SCALE_FACTOR()というマクロが定義されていて、
 *  この子が誤差を吸収してくれます。
 */
//通常版
	const CCSize visibleSize = CCDirector::sharedDirector()->getVisibleSize();
	CCScale9Sprite* pScale = CCScale9Sprite::create("testbg.png", CCRectMake(0, 0, 200 / CC_CONTENT_SCALE_FACTOR(), 100 / CC_CONTENT_SCALE_FACTOR()), CCRectMake(20 / CC_CONTENT_SCALE_FACTOR(), 20 / CC_CONTENT_SCALE_FACTOR(), 160 / CC_CONTENT_SCALE_FACTOR(), 60 / CC_CONTENT_SCALE_FACTOR()));
	//(省略)

//テクスチャアトラス版
	//読み込んでなければ読み込んどく
	CCSpriteFrameCache::sharedSpriteFrameCache()->addSpriteFramesWithFile("test.plist");
	CCScale9Sprite* spr0 = CCScale9Sprite::createWithSpriteFrameName("testbg2.png", CCRectMake(20 / CC_CONTENT_SCALE_FACTOR(), 20 / CC_CONTENT_SCALE_FACTOR(), 160 / CC_CONTENT_SCALE_FACTOR(), 60 / CC_CONTENT_SCALE_FACTOR()));
	//(省略)
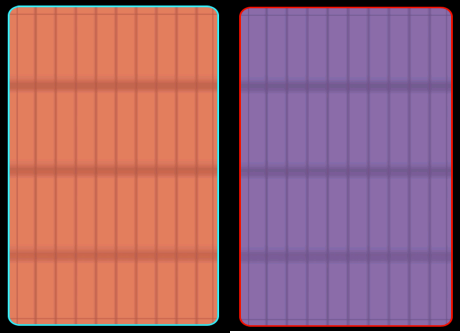
おかげさまできれいに引き延ばすことができましたね。
本当にありがとうございました。
面倒くさくなってきた
若干この矩形の設定方法は面倒ですね(´・ω・`)とりあえずこの「CC_CONTENT_SCALE_FACTOR()」の進撃は止めたいものがあります。
というわけで、CCScale9Spriteを拡張して内部的に吸収するクラスを作成します。
/**
 * CC9Sprite.h
 */
#include "cocos-ext.h"
using namespace cocos2d;
USING_NS_CC_EXT;
class CC9Sprite : public CCScale9Sprite{
public:
	/**
	 * スプライトフレームから作成
	 */
	static CC9Sprite* createWithSpriteFrameName(const char* $fileName , float $perWidth , float $perHeight);
	static CC9Sprite* createWithSpriteFrameName(const char* $fileName , float $percentage){
		return createWithSpriteFrameName($fileName , $percentage , $percentage);
	}
	virtual bool initWithSpriteFrameName(const char* $fileName , float $perWidth , float $perHeight);

	/**
	 *  ファイルから作成
	 */
	static CC9Sprite* createWithFile(const char* $fileName , float $perWidth , float $perHeight);
	static CC9Sprite* createWithFile(const char* $fileName , float $percentage){
		return createWithFile($fileName , $percentage , $percentage);
	}
	virtual bool initWithFile(const char* $fileName , float $perWidth , float $perHeight);
};

/**
 * CC9Sprite.cpp
 */

CC9Sprite* CC9Sprite::createWithSpriteFrameName(const char *$fileName, float $perWidth, float $perHeight){
	CC9Sprite* spr = new CC9Sprite();
	if(spr && spr->initWithSpriteFrameName($fileName, $perWidth, $perHeight)){
		spr->autorelease();
		return spr;
	}
	delete spr;
	spr = NULL;
	return NULL;
};

bool CC9Sprite::initWithSpriteFrameName(const char *$fileName, float $perWidth, float $perHeight){
	CCSpriteFrame* frame = CCSpriteFrameCache::sharedSpriteFrameCache()->spriteFrameByName($fileName);
	float width = frame->getRect().size.width;
	float height = frame->getRect().size.height;

	float perWidth = width / 100.0f * $perWidth;
	float perHeight = height / 100.0f * $perHeight;

	const CCRect capInsents = CCRectMake(perWidth , perHeight , width - perWidth * 2 , height - perHeight * 2);

	return CCScale9Sprite::initWithSpriteFrame(frame, capInsents);
}

CC9Sprite* CC9Sprite::createWithFile(const char *$fileName, float $perWidth, float $perHeight){
	CC9Sprite* spr = new CC9Sprite();
	if(spr && spr->initWithFile($fileName, $perWidth, $perHeight)){
		spr->autorelease();
		return spr;
	}
	delete spr;
	spr = NULL;
	return NULL;
};

bool CC9Sprite::initWithFile(const char *$fileName, float $perWidth, float $perHeight){
	CCTexture2D* texture = CCTextureCache::sharedTextureCache()->addImage($fileName);
	if(texture){
		float width = texture->getContentSize().width;
		float height = texture->getContentSize().height;
		float perWidth = width / 100.0f * $perWidth;
		float perHeight = height / 100.0f * $perHeight;

		const CCRect capInsents = CCRectMake(perWidth , perHeight , width - perWidth * 2 , height - perHeight * 2);
		const CCRect capRect = CCRectMake(0,0,width,height);
		CCSpriteBatchNode* node = CCSpriteBatchNode::createWithTexture(texture , 9);

		return CCScale9Sprite::initWithBatchNode(node, capRect , capInsents);
	}
	return false;
}
ちょっと長くなりましたが、以下のように使えます。
CC9Sprite* spr = CC9Sprite::createWithSpriteFrameName(“画像名”,(スライス幅%),(スライス高さ%));
CC9Sprite* spr = CC9Sprite::createWithFile(“画像名”,(スライス幅%),(スライス高さ%));
ひとつこんな感じで作っておくと色々使いやすいかもです。
はじめまして。
大変参考になります。
cocos2d-x v2.2.6でCC_CONTENT_SCALE_FACTOR()使用すると、Retina、非Retinaどちらでも1しか返却されません。。こういうものなのでしょうか?
返信おそくなってすみません。
CC_CONTENT_SCALE_FACTOR()については、内部的にはCCDirector::sharedDirector()->getContentScaleFactor()を呼び出しているだけになるのですが、
この「ContentScaleFactor」の値は製作者自身で設定するものになります。
★例:CCDirector::sharedDirector()->setContentScaleFactor(1);
その設定をする際に、画面サイズやRetinaと非Retinaによって値を分けるロジックを組み入れるという感じですね。
ですので、設定値が同じ場合はRetinaや非Retina関係なく同じとなります。
ピンバック: 11. カメラ(3) – 富士見研究所